Learn how to install, configure, and optimize Varnish Cache with CloudPanel on a VPS server. This complete guide covers setup steps, performance tuning, caching rules, WordPress optimization, SSL handling, troubleshooting, and security best practices for faster website performance and lower server load.
Why VPS CloudPanel Varnish Cache Matters
Website speed affects everything online. It influences user experience, search engine rankings, conversion rates, and server costs. A slow website can increase bounce rates and reduce customer trust. When you combine a VPS server, CloudPanel, and Varnish Cache, you create a powerful hosting stack capable of handling heavy traffic with excellent performance.
This guide explains everything you need to know about VPS CloudPanel Varnish Cache setup, optimization, and management.
Understanding the Core Components
What Is a VPS?
A VPS, or Virtual Private Server, is a virtualized environment that provides dedicated resources inside a physical server.
Unlike shared hosting, a VPS gives you:
- Dedicated CPU resources
- Dedicated RAM
- Root access
- Better security isolation
- Improved performance
- Greater customization
A VPS is ideal for websites that need speed, flexibility, and scalability.
What Is CloudPanel?
CloudPanel is a lightweight server control panel designed for high-performance PHP hosting.
It supports:
- NGINX
- PHP-FPM
- MySQL or MariaDB
- Redis
- Varnish
- Node.js
- Reverse proxies
- SSL certificates
- Docker integration
CloudPanel is especially popular for WordPress hosting because it consumes very little server memory.
What Is Varnish Cache?
- Varnish Cache is an HTTP accelerator that sits in front of your web server.
- Its main purpose is to cache dynamic content in RAM, allowing pages to load significantly faster.
- Instead of generating a page every time a visitor arrives, Varnish serves a cached version instantly.
Benefits include:
- Faster page load times
- Lower CPU usage
- Reduced database queries
- Better handling of traffic spikes
- Improved Time To First Byte (TTFB)
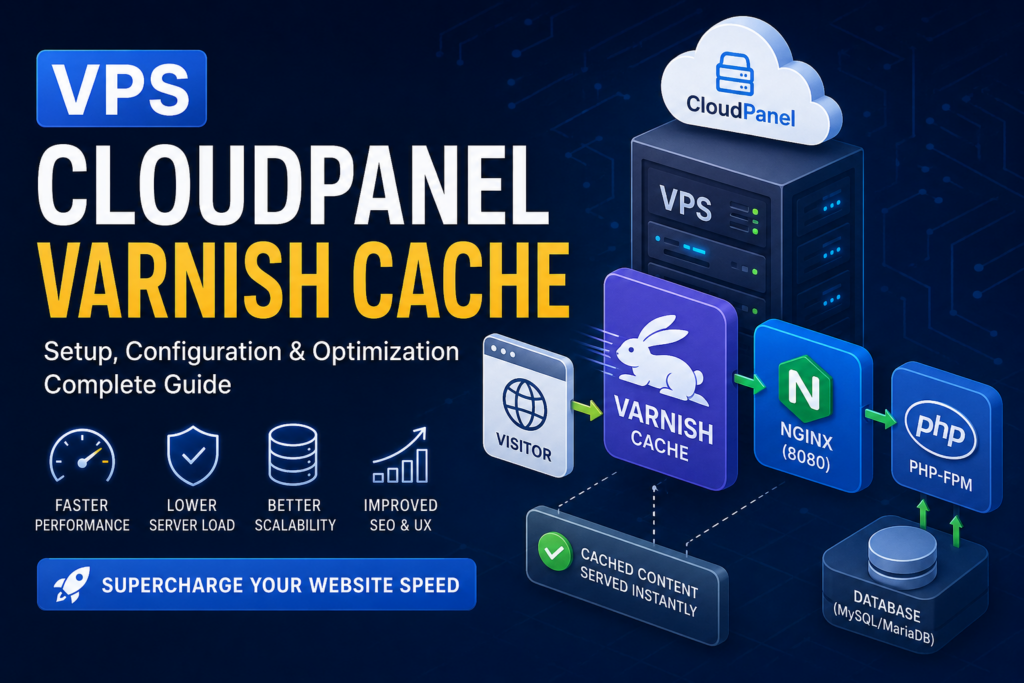
How VPS CloudPanel Varnish Cache Works Together
Request Flow Explained
Here is the basic request process:
- Visitor opens your website
- Request reaches Varnish Cache
- Varnish checks for cached content
- If cache exists, content is delivered instantly
- If not, request passes to NGINX and PHP
- Generated page is stored in cache
- Future visitors receive cached version
This process dramatically reduces server workload.
Advantages of Using Varnish with CloudPanel
Massive Performance Improvements
Varnish can serve thousands of requests per second.
Pages load faster because cached responses avoid repeated PHP execution.
Reduced Server Costs
Efficient caching means fewer server resources are required.
You can often handle more traffic with a smaller VPS plan.
Better SEO Performance
Google values fast websites.
Improved Core Web Vitals can help increase rankings.
Lower Database Load
WordPress websites constantly query the database.
Varnish reduces database requests significantly.
Improved User Experience
Visitors prefer fast-loading websites.
Better performance leads to longer sessions and higher engagement.
VPS Requirements for CloudPanel and Varnish
Recommended VPS Specifications
Small Websites
- 2 CPU cores
- 2GB RAM
- 50GB SSD
Medium Websites
- 4 CPU cores
- 8GB RAM
- 100GB SSD
High Traffic Websites
- 8 CPU cores
- 16GB RAM or more
- NVMe SSD storage
Supported Operating Systems
CloudPanel officially supports:
- Ubuntu 22.04 LTS
- Debian 12
Ubuntu is generally recommended.
Installing CloudPanel on a VPS
Update Your Server
Before installation, update packages:
apt update && apt upgrade -y
Install Dependencies
apt install curl wget sudo -y
Install CloudPanel
For Ubuntu:
curl -sSL https://installer.cloudpanel.io/ce/v2/install.sh | sudo bash
The installer automatically configures:
- NGINX
- PHP
- Database server
- Firewall basics
Access CloudPanel
Open:
https://YOUR_SERVER_IP:8443
Create your admin account.
Installing Varnish Cache on CloudPanel
Install Varnish
apt install varnish -y
Verify Installation
varnishd -V
You should see the installed version.
Configuring Varnish with NGINX
Understanding Port Structure
Default setup:
- Varnish listens on port 80
- NGINX moves to port 8080
Traffic flow:
Visitor → Varnish → NGINX → PHP
Change NGINX Port
Edit NGINX configuration:
nano /etc/nginx/sites-enabled/default
Change:
listen 80;
To:
listen 8080;
Restart NGINX:
systemctl restart nginx
Configuring Varnish Backend
Edit Varnish Configuration
Open:
nano /etc/varnish/default.vcl
Configure backend:
backend default {
    .host = "127.0.0.1";
    .port = "8080";
}
Starting and Enabling Varnish
Enable Service
systemctl enable varnish
Restart Varnish
systemctl restart varnish
Verify Status
systemctl status varnish
Configuring WordPress for Varnish
Why WordPress Needs Special Rules
WordPress uses cookies for:
- Logged-in users
- Comments
- WooCommerce carts
- Sessions
These should bypass cache.
WordPress VCL Rules
Add to VCL:
sub vcl_recv {

    if (req.http.Cookie ~ "wordpress_logged_in") {
        return (pass);
    }

    if (req.url ~ "wp-admin") {
        return (pass);
    }

    if (req.url ~ "preview=true") {
        return (pass);
    }

    if (req.http.Cookie ~ "woocommerce_items_in_cart") {
        return (pass);
    }
}
Configuring WooCommerce with Varnish
Important WooCommerce Pages
Never cache:
- Cart
- Checkout
- My Account
WooCommerce Exclusion Rules
if (req.url ~ "cart|checkout|my-account") {
    return (pass);
}
This prevents broken shopping sessions.
Enabling HTTPS with Varnish
Understanding SSL Handling
Varnish itself does not handle SSL. NGINX usually manages HTTPS termination.
Flow:
HTTPS Visitor → NGINX SSL → Varnish → NGINX Backend
Recommended Setup
- NGINX handles SSL
- Varnish caches HTTP internally
- Use reverse proxy headers
Installing SSL Certificates
Using Let’s Encrypt
CloudPanel supports free SSL certificates.
Inside CloudPanel:
- Open site management
- Select SSL/TLS
- Enable Let’s Encrypt
- Force HTTPS
Configuring Cache Headers
Browser Cache Optimization
Add inside NGINX:
location ~* \.(jpg|jpeg|png|gif|css|js|ico|svg)$ {
    expires 30d;
    add_header Cache-Control "public";
}
This improves browser-side caching.
Varnish Cache Purging
Why Purging Matters
- When content changes, old cache should disappear.
- Otherwise visitors see outdated pages.
Manual Purge Command
varnishadm "ban req.url ~ /"
Purging Specific URLs
varnishadm "ban req.url == /about-us"
WordPress Plugins for Varnish
Recommended Plugins
Proxy Cache Purge
Automatically clears Varnish cache when posts update.
Breeze Cache
Works well with reverse proxies.
LiteSpeed Cache
- Useful if not using Varnish simultaneously.
- Avoid multiple full-page cache systems together.
Advanced Varnish Optimization Increasing Cache Memory
Edit Varnish Startup Parameters
Open:
nano /etc/systemd/system/varnish.service
Adjust storage:
-s malloc,2G
This allocates 2GB RAM for caching.
Reload Systemd
systemctl daemon-reload
systemctl restart varnish
Optimizing TTL Settings
What Is TTL?
TTL means Time To Live.
It determines how long cache stays valid.
Example TTL Configuration
sub vcl_backend_response {
    set beresp.ttl = 1h;
}
Compression Optimization
Enable GZIP Compression
sub vcl_deliver {
    if (obj.hits > 0) {
        set resp.http.X-Cache = "HIT";
    } else {
        set resp.http.X-Cache = "MISS";
    }
}
This helps debugging cache hits.
Monitoring Varnish Performance
Useful Commands
Real-Time Statistics
varnishstat
Live Requests
varnishlog
Top Requests
varnishtop
These tools help identify bottlenecks.
Measuring Website Speed
Recommended Testing Tools
GTmetrix
Analyzes page performance and recommendations.
Google PageSpeed Insights
Measures Core Web Vitals.
WebPageTest
Advanced performance testing.
Pingdom
Simple speed monitoring.
Best VPS Providers for CloudPanel Varnish
DigitalOcean
Excellent balance between simplicity and performance.
Vultr
Affordable and widely available.
Hetzner
Outstanding performance per dollar.
Linode
Reliable cloud infrastructure.
AWS Lightsail
Good integration with AWS ecosystem.
Security Best Practices, Secure SSH Access
Change Default SSH Port
Edit:
nano /etc/ssh/sshd_config
Change:
Port 22
Restart SSH:
systemctl restart ssh
Disable Root Login
PermitRootLogin no
Configure Firewall
Install UFW
apt install ufw -y
Allow Required Ports
ufw allow 22
ufw allow 80
ufw allow 443
ufw allow 8443
Enable Firewall
ufw enable
Protect Against DDoS
Rate Limiting
Use NGINX rate limiting:
limit_req_zone $binary_remote_addr zone=one:10m rate=10r/s;
Common VPS CloudPanel Varnish Problems, Varnish Not Caching
Possible Causes
- Cookies preventing caching
- Wrong backend port
- Cache-control headers
- Session conflicts
Solution
Check headers:
curl -I https://yourdomain.com
Look for:
X-Cache: HIT
Infinite Redirect Loops
Common Cause
Incorrect HTTPS configuration.
Fix
Ensure correct forwarding headers:
proxy_set_header X-Forwarded-Proto https;
WooCommerce Cart Issues
Problem
Cart contents disappear.
Cause
Cart pages cached accidentally.
Solution
Exclude WooCommerce pages from cache.
High RAM Usage
Why It Happens
Varnish stores cache in memory.
Large cache sizes increase RAM usage.
Fix
Lower cache allocation:
-s malloc,1G
Best Practices for Maximum Performance
Use Redis Object Cache
- Redis complements Varnish perfectly.
- Varnish caches full pages.
- Redis caches database queries and objects.
Install Redis
apt install redis-server -y
Optimize PHP
Recommended PHP Settings
memory_limit = 512M
max_execution_time = 300
upload_max_filesize = 128M
Use HTTP/2 and HTTP/3
Modern protocols improve loading speed.
CloudPanel supports both through NGINX.
Enable Brotli Compression
Brotli often compresses better than GZIP.
Keep Software Updated
Update regularly:
apt update && apt upgrade -y
CloudPanel vs cPanel for Varnish
CloudPanel Advantages
- Lightweight
- Faster
- Free
- Better modern stack support
- Easier Varnish integration
cPanel Advantages
- Larger ecosystem
- More plugins
- Beginner familiarity
CloudPanel usually wins for performance-focused deployments.
Is Varnish Better Than NGINX FastCGI Cache?
Varnish Advantages
- Extremely fast
- Advanced caching logic
- Flexible VCL language
FastCGI Cache Advantages
- Simpler setup
- Easier HTTPS handling
- Lower complexity
Varnish is more powerful for high-traffic websites.
Should You Use CDN with Varnish?
Yes, in Most Cases
A CDN provides:
- Global edge caching
- DDoS protection
- Reduced bandwidth
- Faster worldwide delivery
Popular CDNs:
- Cloudflare
- BunnyCDN
- KeyCDN
- Fastly
Cloudflare and Varnish Together
Recommended Setup
Visitor → Cloudflare → Varnish → NGINX → PHP
Benefits include:
- Extra caching layer
- Security filtering
- Reduced attack exposure
Scaling a VPS CloudPanel Varnish Stack
Vertical Scaling
Increase:
- CPU
- RAM
- Storage
Horizontal Scaling
Add:
- Load balancers
- Multiple app servers
- Database replicas
Backup Strategy
Important Backups
Always back up:
- Website files
- Databases
- CloudPanel configs
- Varnish configuration files
Recommended Backup Frequency
- Daily database backups
- Weekly full server snapshots
Logging and Troubleshooting
NGINX Logs
/var/log/nginx/error.log
Varnish Logs
journalctl -u varnish
PHP Logs
/var/log/php/
Real-World Performance Expectations
Typical Improvements
After enabling Varnish:
- TTFB may drop by 70%
- Page load time can improve by 50%
- CPU usage often decreases dramatically
Results depend on:
- Website optimization
- Plugin quality
- VPS resources
- Traffic patterns
Who Should Use VPS CloudPanel Varnish?
Ideal Users
- WordPress site owners
- WooCommerce stores
- Agencies
- SaaS startups
- High-traffic blogs
- Developers
Who Should Avoid It?
Beginners Without Server Experience
Varnish adds complexity. If you prefer simplicity, managed hosting may be better.
Final Thoughts on High-Speed Hosting
VPS CloudPanel Varnish Cache creates one of the fastest self-managed hosting environments available today.
The combination offers:
- Outstanding speed
- Low resource usage
- Excellent scalability
- Advanced caching control
- Improved SEO performance
Although setup requires technical knowledge, the long-term performance benefits are substantial.
If your website experiences heavy traffic or slow loading times, implementing Varnish on CloudPanel can dramatically improve responsiveness and stability.
Frequently Asked Questions
What is Varnish Cache used for?
Varnish Cache accelerates websites by storing cached versions of pages in RAM, reducing server processing time.
Does CloudPanel support Varnish natively?
CloudPanel works very well with Varnish, although some manual configuration may still be necessary.
Can Varnish cache WordPress websites?
Yes. Varnish can cache WordPress efficiently when proper exclusions are configured.
Is Varnish better than Redis?
They serve different purposes. Varnish handles full-page caching while Redis manages object caching.
Does Varnish work with WooCommerce?
Yes, but cart and checkout pages must bypass cache.
How much RAM does Varnish need?
Small websites may only need 512MB to 1GB. Larger websites benefit from several gigabytes of RAM.
Can Varnish handle HTTPS?
Not directly. HTTPS termination is usually handled by NGINX or another reverse proxy.
Is CloudPanel free?
Yes. CloudPanel Community Edition is free to use.
Does Varnish improve SEO?
Yes. Faster loading speeds can improve Core Web Vitals and search rankings.
Should I use Cloudflare with Varnish?
Yes. Cloudflare adds extra caching, security, and global CDN benefits.
Important Notes Before Deployment
- Always test configuration changes on a staging server before applying them to production.
- A small mistake in VCL or NGINX configuration can temporarily break website access.
- Careful monitoring after deployment is strongly recommended.
⚠️ Disclaimer and Source Hygiene
This article is intended for educational and informational purposes only. Server configurations vary depending on infrastructure, operating systems, software versions, and hosting environments. Always consult qualified system administrators or hosting professionals before making major production server changes.
Information in this guide is based on research, practical deployment methods, Linux administration standards, CloudPanel documentation, Varnish Cache documentation, NGINX best practices, and modern WordPress hosting optimization strategies.
🔔 For more tutorials like this, consider subscribing to our blog.
📩 Do you have questions or suggestions? Leave a comment or contact us!
🏷️ Tags: VPS hosting, CloudPanel, Varnish Cache, WordPress optimization, NGINX caching, VPS performance, WooCommerce cache, Linux server optimization, CloudPanel tutorial, website speed optimization
📢 Hashtags: #VPSHosting, #CloudPanel, #VarnishCache, #WordPressSpeed, #NGINX, #WooCommerce, #LinuxServer, #WebHosting, #WebsiteOptimization, #ServerManagement
📚 Sources and References
- Official CloudPanel Documentation
- Official Varnish Cache Documentation
- NGINX Documentation
- Ubuntu Server Documentation
- WordPress Developer Resources
- WooCommerce Documentation
- Redis Documentation
- Cloudflare Documentation
🕊️ Secondary Sources and Testimonials
Many hosting professionals and WordPress developers recommend combining CloudPanel and Varnish for high-performance hosting environments. Community benchmarks consistently show substantial improvements in server response times, especially for WordPress and WooCommerce websites under moderate to heavy traffic.