
Table of Contents
Learn how to display Google Search Console clicks automatically in WordPress with a lightweight free plugin. This guide covers Google API setup, service account authentication, secure JSON storage, PHP GMP configuration, automatic updates, shortcode placement, widget setup, and practical troubleshooting for common server errors.

Display Google Search Console Clicks Automatically in WordPress
Google Search Console provides some of the most useful information available to a website owner. It shows how people discover a website through Google Search, which pages receive impressions, which queries generate visits, and how many searchers actually click through to the site.
Normally, however, those numbers stay inside the Search Console dashboard. If you want to display a small traffic milestone on your WordPress website, you either need to update it manually or create a connection between WordPress and Google’s Search Console API.
That is exactly what GSC Auto Clicks Badge is designed to do. The plugin connects WordPress to the Google Search Console API and retrieves the total number of Google Search clicks for a configurable period. By default, it displays clicks from the previous 28 days.
Once configured, the badge updates automatically. You can place it in a sidebar using the included WordPress widget or insert it into a page, post, block area, or compatible page builder using a shortcode.
This tutorial walks through the entire configuration. It also explains an important part that many API tutorials overlook: how to keep the Google service-account private key outside the publicly accessible WordPress directory.
What Is GSC Auto Clicks Badge?
GSC Auto Clicks Badge is a lightweight WordPress plugin created to turn Search Console performance data into a simple visual milestone. Instead of logging into Search Console every time you want to check the current figure, WordPress retrieves the information through Google’s API and caches the result locally.
For example, if Search Console reports 40 clicks during the selected 28-day period, the front-end badge can display 40 Google Search clicks in the last 28 days. When the API later reports a different number, the cached value can be refreshed automatically.
The plugin includes both a traditional WordPress widget and the following shortcode:
This makes placement flexible. You can use the widget in a sidebar, while the shortcode works well inside pages, posts, reusable blocks, footer sections, or other locations that process WordPress shortcodes.
The goal is deliberately narrow. This is not intended to replace Search Console, Google Analytics, or a full SEO dashboard. It provides one easy-to-understand metric: organic Google Search clicks during the configured reporting period.
Why Display Search Console Clicks on Your Website?
Traffic counters have existed almost as long as websites themselves, but Search Console clicks represent something more specific than a traditional visitor counter. They measure clicks generated from Google Search results for the connected Search Console property.
That distinction matters. A site may receive visitors from social media, bookmarks, direct traffic, newsletters, referral links, and many other sources. The number shown by this plugin represents Search Console data rather than total website visits.
For a growing website, displaying the number can create a simple milestone system. A new project might celebrate its first 10 or 50 organic clicks. Later, the same badge could show hundreds or thousands of clicks without requiring someone to edit the number manually.
It can also be useful privately. You might place the widget inside a restricted dashboard, staging environment, internal page, or administrator-oriented section rather than making it visible to every visitor.
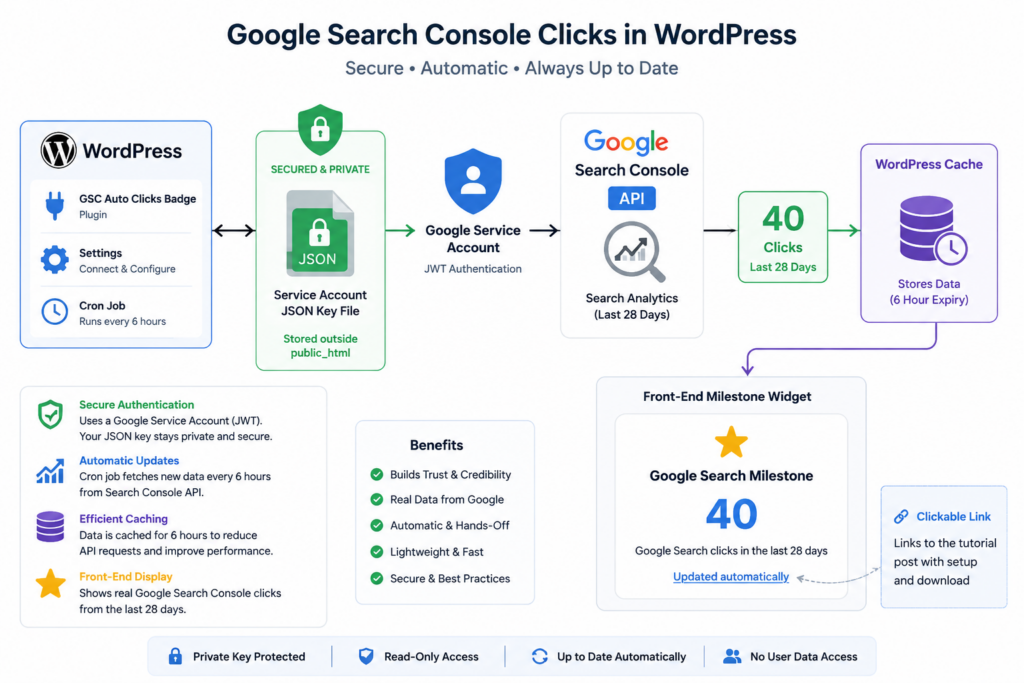
How the WordPress Search Console Widget Works
The process involves several components, but each has a specific job. Google Search Console remains the source of the performance data. Google Cloud provides API access and the service account used by WordPress for authentication.
The WordPress plugin creates a signed authentication request using the service-account credentials. After Google accepts that request, it provides a temporary OAuth access token. The plugin then requests Search Analytics data for the Search Console property configured in WordPress.
The returned click total is cached rather than requesting fresh information every time somebody loads a page. This is important because API calls should not become part of every normal front-end WordPress request.
A simplified flow looks like this:
WordPress → Service Account → Google OAuth → Search Console API → Click Data → WordPress Cache → Badge
This architecture also means the Google private key deserves special protection. It should not be placed inside a publicly downloadable directory.
Requirements Before Installing the Plugin

Before starting, make sure the WordPress website already has a verified Google Search Console property. You will need sufficient permissions to add the Google service account to that property.
You also need access to Google Cloud so that you can enable the Search Console API and create a service account. The downloadable JSON credential generated for that service account contains a private key. Treat this file like a password or other server credential.
On the server side, the current public version of the plugin requires PHP GMP for its RSA signing compatibility implementation. This became particularly useful on environments where OpenSSL 3 rejects an otherwise valid Google PKCS#8 key through its local decoder configuration.
The server must also allow outbound HTTPS requests from WordPress because the plugin needs to communicate with Google’s OAuth and Search Console API endpoints.
Download GSC Auto Clicks Badge for WordPress
The plugin is distributed as a normal WordPress ZIP package. After downloading it, you can install it through the standard WordPress plugin installer.
Free download:
GSC Auto Clicks Badge
For the public download on wpzone.blog, I recommend placing the final v1.5 release ZIP here rather than publishing the development-oriented v1.4 build.
After downloading the ZIP, do not extract it before uploading it through the WordPress dashboard. WordPress expects the packaged plugin archive.
Install GSC Auto Clicks Badge
Open your WordPress administration dashboard and navigate to Plugins → Add New Plugin → Upload Plugin. Select the GSC Auto Clicks Badge ZIP archive and allow WordPress to install it.
Once installation finishes, select Activate Plugin. A new configuration page named GSC Clicks Badge will become available under the WordPress Settings menu.
Do not test the API connection immediately. WordPress still needs a Search Console property, the Google service account, its credential file, and the required server support before authentication can succeed.
Completing the configuration in the correct order makes troubleshooting considerably easier.
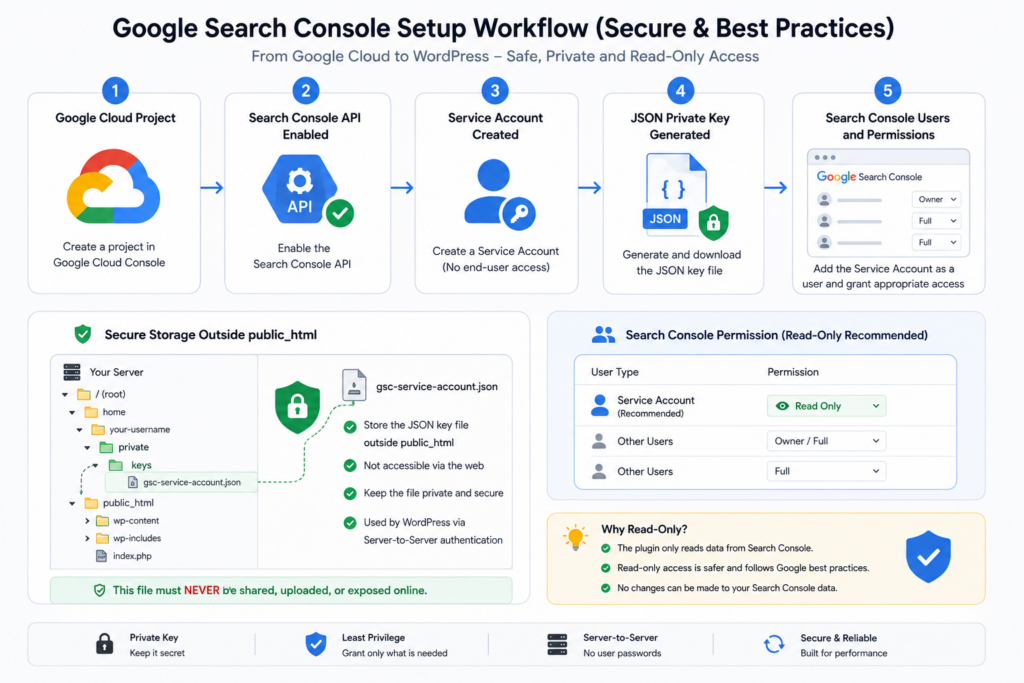
Enable the Google Search Console API
Open Google Cloud Console and select the project that you want to use for this integration. A dedicated project can make credential management easier, although an existing appropriate project can also be used.
Navigate to the API library and search for Google Search Console API. Open it and choose Enable. The API service is identified by Google as searchconsole.googleapis.com.
Enabling the API does not automatically grant access to your website. It only allows the Google Cloud project to communicate with the Search Console API. We still need to create an identity and authorize that identity for the Search Console property.
That identity will be the service account.
Create a Google Service Account
Inside Google Cloud, open the service account management area and create a new service account. Give it a descriptive name that makes its purpose obvious later, such as:
wpzone-search-console
Google will assign an email address to the service account. Keep that email available because it must be added to Google Search Console.
You generally do not need to grant broad Google Cloud project permissions merely to read the Search Console data used by this plugin. Search Console property access is managed separately.
After creating the account, open it and locate the Keys section. Create a new key using the JSON format. Google will download a .json file to your device.
Protect this file carefully.
Never Publish the Google JSON Private Key
The downloaded JSON file is not a normal configuration file that should be placed inside a blog post or Media Library. It contains credentials that allow software to authenticate as the service account.
Never paste its private_key into a public tutorial, GitHub issue, forum post, screenshot, support ticket, or WordPress article.
You should also avoid storing the credential inside /public_html/ when your hosting environment allows you to place it outside the web root. Files under the public web directory can potentially become accessible if server configuration changes or another mistake exposes them.
GSC Auto Clicks Badge therefore supports reading the credential from a private server path. This provides a cleaner separation between your public WordPress files and the secret used for Google authentication.
Add the Service Account to Google Search Console
Creating the service account is only half of the authorization process. Google Search Console still needs to know that this account is allowed to access the website property.
Open Search Console and select the exact property you want WordPress to query. Navigate to Settings → Users and permissions and add the service-account email address generated in Google Cloud.
Grant the level of access needed to view performance information. For this integration, the account does not need to become the verified owner of the website simply to retrieve the required Search Analytics data.
Once added, the service account and Google Cloud API configuration work together: Google Cloud provides the authentication identity, while Search Console determines whether that identity may access the selected property.
Check the Exact Search Console Property
One of the easiest mistakes is entering a property identifier that does not exactly match the property Google expects.
A URL-prefix property may look like:
A domain property uses a different API identifier, such as:
sc-domain:wpzone.blog
These values are not interchangeable. If your Search Console account uses the URL-prefix property, enter that exact URL in the plugin. If you use the domain property, enter the sc-domain: version.
Pay attention to HTTPS and the trailing slash when working with a URL-prefix property. The safest approach is to copy the property exactly as Search Console identifies it rather than guessing its format.
Enable PHP GMP on cPanel and WHM
The plugin’s compatibility signing implementation uses PHP GMP. If the extension is unavailable, the settings screen reports:
GMP Missing
On a cPanel/WHM server using EasyApache 4, an administrator can normally install the GMP package corresponding to the PHP version assigned to the WordPress domain.
For PHP 8.3, the package is commonly presented as:
php83-php-gmp
or, depending on the package naming displayed by the environment:
ea-php83-php-gmp
Open WHM → EasyApache 4 → Customize → PHP Extensions, search for gmp, and select the package belonging to the PHP version actually used by the site.
Continue through Review and Provision. EasyApache will install the selected extension and report when provisioning has completed.
Return to the WordPress plugin settings afterward. The compatibility indicator should now report:
GMP Available
Do not install extensions for unrelated PHP versions simply because they appear in the list. Match the extension to the PHP runtime assigned to the WordPress website.
Why GMP Is Used Instead of Depending Entirely on OpenSSL
PHP installations commonly provide OpenSSL, and under normal circumstances OpenSSL is an obvious choice for cryptographic signing. However, OpenSSL 3 environments can differ depending on providers, policies, packaging, and server configuration.
During compatibility testing, a valid Google service-account key could reach PHP while the OpenSSL decoder still returned errors such as DECODER routines::unsupported. Another malformed or altered key can result in errors such as invalid key length.
Rather than encouraging users to weaken system-wide OpenSSL policies, the compatibility implementation can parse the specific unencrypted PKCS#8 RSA key format generated for the Google service account and perform the required RSA operation with GMP.
This approach is deliberately limited to the plugin’s authentication purpose. It does not suggest disabling OpenSSL security settings or changing global cryptographic policies merely to make a WordPress widget work.
Store the Google JSON Outside public_html
Now we reach one of the most important security steps.
Open cPanel → File Manager and navigate to the hosting account’s home directory. In a typical cPanel layout, public_html is located inside that home directory.
Instead of uploading the credential into:
/home/username/public_html/
place it one level above the public web root, for example:
/home/username/gsc-service-account.json
The exact username and path depend on your hosting account. The plugin settings page provides a recommended path based on the detected WordPress installation.
Rename the file to:
gsc-service-account.json
Using a predictable filename makes configuration easier, while keeping it outside public_html prevents normal web requests from directly reaching it.
Configure the JSON Server Path
Return to WordPress → Settings → GSC Clicks Badge. Locate the JSON server path field.
Enter the complete filesystem path to the credential file. For example:
/home/username/gsc-service-account.json
Do not enter a website URL such as https://example.com/gsc-service-account.json. The plugin expects a local server filesystem path, not an HTTP address.
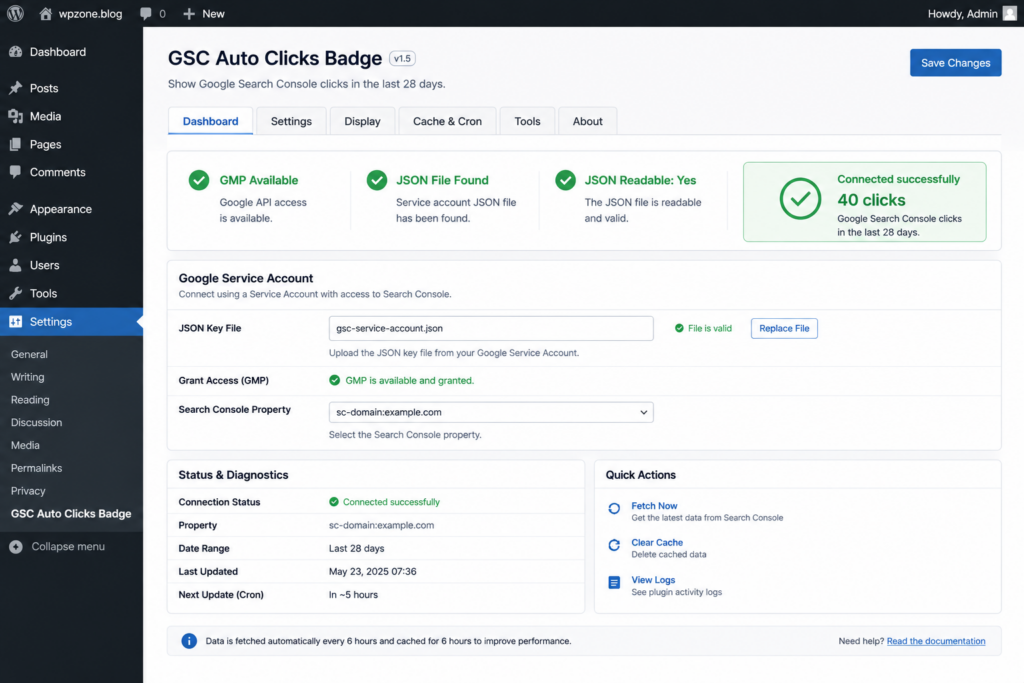
Save the settings. The diagnostic section should then be able to confirm three important conditions:
GMP: Available
JSON file: Found
JSON readable: Yes
When all three are positive, WordPress has the basic server-side requirements needed to attempt authentication.
Test the Google Search Console Connection
With the Search Console property saved, GMP available, and the private JSON file readable, select:
Test connection & refresh now
The plugin creates a signed JWT assertion, exchanges it with Google’s OAuth service for a temporary access token, and then sends a request to the Search Console Search Analytics API.
If everything is configured correctly, WordPress displays a successful connection message along with the number of clicks returned for the selected period.
For example:
Connected successfully – 40 clicks.
At this point the most difficult part is finished. WordPress can authenticate with Google, the service account has permission to access the property, and the Search Console API is returning performance data.
Display the Search Console Badge With a Shortcode
Once the connection works, the easiest way to display the badge is the included shortcode:
Add a Shortcode block in the WordPress Block Editor and paste the shortcode into it. Publish or update the page, then inspect the result on the front end.
The badge displays the configured title, the current click total, the reporting period, and an indication that the value updates automatically.
Because this is a standard WordPress shortcode, it can also work in many themes, builders, hooks, widget areas, and custom templates that execute shortcode content.
Avoid placing dozens of copies of the badge across the site without a reason. One well-positioned milestone is usually more useful than repeating the same metric everywhere.
Add the Search Console Clicks Widget to a Sidebar
If your WordPress theme supports classic widget areas, navigate to Appearance → Widgets and locate:
GSC Clicks Badge
Add it to the desired sidebar or compatible widget area. Depending on your theme, you may also be able to control its placement through the Customizer or block-based widget interface.
The widget uses the same cached Search Console data as the shortcode. Adding both does not mean that Google needs to receive a new API request for every displayed instance.
A sidebar is particularly suitable for a milestone because it allows visitors to see the number while reading posts without interrupting the article itself.
How Automatic Updates Work
A useful API integration should not contact Google every time a visitor opens a page. Doing that would increase latency, create unnecessary external requests, and make the front end dependent on Google’s API response time.
GSC Auto Clicks Badge therefore stores the retrieved result in a WordPress transient. The cached value is used for normal badge rendering.
The plugin also registers a daily WordPress cron event to refresh Search Console information. This means the displayed number can progress automatically as new finalized data becomes available.
Remember that Search Console is not a real-time analytics service. Recent performance data can take time to settle, which is why the plugin includes a configurable data lag.
Why the Default Data Lag Is Two Days
The default configuration uses a two-day data lag. If today is August 29, for example, the query does not necessarily treat August 29 as the final day of the reporting period.
This reduces reliance on the newest Search Console data while it may still be incomplete or changing.
For a public milestone widget, a small delay is usually preferable to displaying a number that moves unexpectedly because recent data has not fully settled.
Users who understand the implications can change the lag value in the plugin settings. For most websites, however, the default provides a sensible balance between freshness and stability.
Understanding the 28-Day Click Number
If the badge says:
40 Google Search clicks in the last 28 days
that does not mean the website has received only 40 total visitors. It also does not represent lifetime Google traffic.
The value is a rolling Search Console measurement for the configured period. As an older day leaves the 28-day window and a newer day enters it, the total can increase, stay stable, or even decrease.
That behavior is normal.
If you want a milestone that can only move upward, you would need a different design. For example, the plugin could store cumulative milestones independently instead of displaying a rolling Search Console period.
For the current widget, the goal is to reflect the selected Search Console reporting window accurately.
Troubleshooting “Enter the Exact Search Console Property”
If the plugin displays:
Enter the exact Search Console property
check the settings page first. A light gray example inside an empty input field is only a placeholder. It is not a saved value.
For a URL-prefix property, you might need:
For a Domain property, you might need:
sc-domain:example.com
Enter the correct value and select Save Changes before running the connection test again.
If authentication works but the API reports that the property is inaccessible, verify that the service-account email was added to the same Search Console property you entered in WordPress.
Troubleshooting GMP Missing
If the plugin reports GMP Missing, the PHP runtime serving WordPress does not currently expose the GMP extension.
On WHM/cPanel servers, check EasyApache 4 and install the GMP extension corresponding to the domain’s PHP version. If the website runs PHP 8.3, enabling GMP only for PHP 8.2 will not solve the problem.
After provisioning, reload the plugin settings page.
If it still reports missing, confirm the PHP version assigned to the domain using MultiPHP Manager. PHP CLI and the PHP version used by Apache or PHP-FPM do not always have identical configurations.
Managed-hosting customers who cannot install PHP extensions themselves should contact their hosting provider rather than changing unrelated server packages.
Troubleshooting JSON File Not Found
When the settings page reports JSON file: Not found, compare the configured path with the actual location in File Manager.
A Linux filesystem path is case-sensitive. A file called:
GSC-Service-Account.json
is different from:
gsc-service-account.json
Also confirm that the path starts from the correct account home directory. Do not add /public_html/ merely because WordPress itself lives there.
The goal is specifically to keep the credential outside the public document root whenever the hosting environment permits it.
Once the file is in the correct location, reload the plugin settings and check the diagnostic status again.
Troubleshooting JSON Readable: No
A file can exist while still being inaccessible to the PHP process. In that situation, the plugin may report that the JSON file was found but is not readable.
Check file ownership and permissions through cPanel File Manager. The credential should be readable by the account running the website without being made unnecessarily permissive.
Avoid solving permission problems by blindly setting sensitive files to world-writable permissions such as 777.
If PHP-FPM runs under the hosting account, normal restrictive file permissions are usually sufficient. Hosting configurations vary, so ask the server administrator when ownership or access-control behavior is unclear.
Security should not be weakened simply to make an API credential easier to read.
Troubleshooting OpenSSL Invalid Key Length
An invalid key length error generally indicates that the private-key data reaching the cryptographic function is not being interpreted as a valid key.
Copying JSON credentials manually can introduce formatting problems. Newline escapes inside the private_key value are particularly easy to damage when moving the contents through mobile browsers, text fields, messaging applications, or editors.
This is one reason the current setup uses the original downloaded JSON file instead of asking users to copy its private key into WordPress.
If you suspect that a credential has been altered or exposed, create a new service-account key in Google Cloud and revoke or delete the old key as appropriate. Never attempt to repair a secret key by guessing missing characters.
Troubleshooting OpenSSL DECODER Routines Unsupported
Some OpenSSL 3 configurations may produce an error similar to:
DECODER routines::unsupported
This can occur at the local cryptographic decoding layer before the request ever reaches Google.
The important point is that changing Search Console permissions will not fix a local decoder failure. Search Console cannot accept or reject a request that the server has not successfully created yet.
The plugin’s compatibility signing path was developed specifically to avoid depending on that failing PEM-decoder path for Google’s expected service-account RSA key format.
This is also why GMP appears in the requirements. It provides the large-integer operations needed by the compatibility signer without requiring administrators to weaken or globally reconfigure OpenSSL.
What to Do If Google OAuth Authentication Fails
An OAuth error occurs later in the process than a local key-loading problem. At this stage, WordPress has produced an authentication assertion and Google has responded to it.
Check whether the service-account key is still active and belongs to the service account you intended to use. Also make sure the server clock is reasonably accurate because signed authentication assertions contain issue and expiration timestamps.
Do not post the complete JWT, JSON credential, or private key publicly when requesting support.
Error messages can usually be shared after removing sensitive identifiers. The private key itself should never be required for ordinary troubleshooting.
What to Do If Search Console Returns a Permission Error
If OAuth succeeds but the Search Console API denies access, inspect the property permissions.
The service account has an email address just like another Google identity. That address needs to appear in the Search Console property’s user list with sufficient permission to access performance reports.
Also verify that the property string configured in WordPress corresponds to that exact property.
For example, adding the service account to a Domain property does not automatically mean a differently configured URL-prefix identifier should be assumed to work in every API request.
When troubleshooting, compare all three values carefully: the property shown in Search Console, the property configured in WordPress, and the property to which the service account was granted access.
Security Best Practices for the Plugin
A working integration is not finished until its credentials are handled safely. Keep the JSON service-account file outside the public document root and restrict access to trusted server processes and administrators.
Do not include the JSON file inside WordPress backups that are publicly downloadable. If your backup system stores the account’s entire home directory, make sure the backup destination itself is protected.
Limit the service account to the access actually required. There is no reason for a simple Search Console reporting widget to receive unrelated Google Cloud privileges.
If you believe the credential has leaked, rotate it. Create a replacement key, update the private server file, confirm the new connection, and remove the compromised key from the service account.
Finally, keep WordPress, the plugin, PHP, and the server environment maintained. Protecting one credential cannot compensate for an otherwise compromised WordPress installation.
Performance Considerations
The plugin intentionally caches Search Console results. This keeps the visual badge lightweight because normal visitors do not need to wait for a live Google API request.
Caching also reduces the number of authentication operations. The OAuth access token itself is temporary and can be cached for its useful lifetime, while Search Console click data can remain cached substantially longer.
For most blogs, daily refreshes are more than sufficient because the widget represents a multi-day reporting window rather than real-time activity.
If your WordPress installation disables normal WP-Cron execution and uses a real server cron instead, that is also compatible as long as scheduled WordPress events continue to run.
A properly configured server cron that invokes wp-cron.php periodically can actually provide more predictable scheduling on low-traffic websites.
Should You Make Search Console Traffic Public?
Displaying traffic is a personal publishing decision. Some website owners enjoy showing growth milestones because they make a young project’s progress visible. Others prefer to keep performance information private.
There is no SEO requirement to display your Search Console click count.
If you publish the badge, remember that it exposes a limited traffic metric to visitors and potentially competitors. The number does not reveal individual search queries or personal visitor information, but it still communicates something about the site’s organic performance.
You can therefore use the same plugin without placing the badge publicly. An internal page or administrator-only location may be more appropriate for some projects.
Customizing the Badge
The default design intentionally keeps the badge simple. It uses a milestone-style star, a prominent blue click number, a title, and a short description of the reporting period.
Theme developers can adjust the presentation with CSS. However, customization should remain separate from the API authentication logic.
That separation is useful when updating the plugin. A design change should not require modifying JWT signing, OAuth requests, credential paths, or Search Console queries.
If you need more advanced visualizations later, a future release could introduce configurable colors, compact mode, multiple reporting periods, impressions, CTR, or average position while preserving the same secure connection architecture.
Potential Features for Future Releases
The first public release should remain focused and reliable. Feature growth is useful only when it does not make setup unnecessarily complicated.
Several additions could nevertheless be valuable. A dashboard card could show clicks without requiring a public widget. Administrators might also benefit from impressions, CTR, and average position alongside clicks.
Another useful option would be milestone tracking. Instead of only showing a rolling 28-day number, WordPress could remember when the site first passed 50, 100, 500, or 1,000 clicks and display an achievement badge.
A system-status panel could provide PHP version, GMP availability, cron status, cache status, last successful API refresh, and credential-file readability without exposing sensitive credential contents.
These features can be introduced gradually while keeping the basic shortcode straightforward.
Frequently Asked Questions
Is GSC Auto Clicks Badge free?
Yes. The version provided with this tutorial is intended as a free WordPress utility for displaying Google Search Console click information.
Does the plugin show total website visitors?
No. It displays clicks reported by Google Search Console for the configured property and reporting period. It is not a replacement for a full analytics platform.
What is the default reporting period?
The default period is 28 days, with a two-day data lag. Both values can be configured.
Why does the number sometimes decrease?
The default badge uses a rolling period. When an older high-traffic day leaves the window, the total can decrease even if the website continues receiving Google traffic.
Does the plugin require a Google service account?
Yes. The service account allows WordPress to authenticate programmatically without requiring an administrator to manually log in every time data refreshes.
Where should I store the service-account JSON?
Preferably outside public_html or the equivalent public document root. The plugin accepts a local filesystem path to the credential.
Should I upload the JSON to the WordPress Media Library?
No. A service-account JSON contains a private key and should not be treated like a public media asset.
Why does the plugin require PHP GMP?
The compatibility signing implementation uses GMP for RSA operations, avoiding an OpenSSL 3 decoder problem encountered on some server configurations.
Can I use the badge in a WordPress sidebar?
Yes. Use the included GSC Clicks Badge widget or insert
Does the plugin contact Google on every page load?
No. Search Console results are cached so that ordinary front-end requests do not need to perform a new API request every time.
A Simple Search Milestone That Updates Itself
Connecting WordPress to Search Console requires more setup than manually typing a traffic number into a widget. The advantage becomes clear once the integration is running.
Google remains the source of the performance data. WordPress retrieves the click count, caches it, and presents it in a simple milestone badge without requiring repeated manual edits.
More importantly, the credential can remain outside the public WordPress directory. The integration does not require publishing a Google private key or weakening server-wide OpenSSL security settings.
For bloggers who enjoy tracking organic growth, GSC Auto Clicks Badge provides a small but useful bridge between Search Console and the WordPress front end.
⚠️ Disclaimer and Source Hygiene
This tutorial is provided for educational and informational purposes. Server configurations, PHP packages, Google Cloud interfaces, Search Console permissions, and API requirements can change over time. Always review current Google and hosting-provider documentation before making production changes. Private keys and service-account credentials are security-sensitive. Never publish them, include them in screenshots, or send them through unsecured support channels. Server administrators should evaluate permissions, backups, credential storage, and PHP extensions according to their own security requirements. The technical workflow described here is based on Google’s service-account OAuth model, the Search Console API, standard WordPress functionality, and practical testing of the plugin configuration.
🔔 For more tutorials like this, consider subscribing to our blog.
📩 Do you have questions or suggestions? Leave a comment or contact us!
🏷️ Tags: Google Search Console, WordPress, Search Console API, WordPress plugin, Google Search Console clicks, WordPress widget, Google API, cPanel, PHP GMP, WordPress SEO
📢 Hashtags: #WordPress, #GoogleSearchConsole, #WordPressPlugin, #SearchConsole, #WordPressSEO, #GoogleAPI, #Webmaster, #cPanel, #SEO, #WordPressTutorial
Sources and References
For current implementation details, consult Google’s official documentation for the Search Console API, Search Analytics query method, OAuth 2.0 service accounts, and Google Cloud service-account keys. WordPress developers should also consult the official documentation for the HTTP API, Transients API, Shortcode API, Widgets API, and WP-Cron.
For cPanel servers, consult the current EasyApache 4 documentation before installing or removing PHP extensions. Package names can differ by PHP version and server configuration.
Secondary Sources and Testimonials
The plugin workflow was refined through practical deployment testing on a WordPress installation using a cPanel/WHM environment. Testing covered service-account authorization, Search Console property access, PHP GMP availability, credential storage outside the public document root, OAuth authentication, API retrieval, caching, and front-end widget rendering.
The resulting implementation successfully retrieved the same 28-day Search Console click milestone expected from the configured property while allowing WordPress to display the value automatically.
Sign in with a Subscriber account to vote.
1 thought on “Display Google Search Console Clicks”